Hyper-V Data Recovery
Virtual machines are extremely useful tools for data storage. But your virtual environment is only as fault-tolerant as your server.
There are many different competing vendors for virtual environments out there. Two of the major vendors are Microsoft and VMWare. While all of their products have more or less the same capabilities, each has its own quirks and peculiarities. Physical and logical damage to your server can lock you out of your virtual machines. If you’ve lost data from a Hyper-V virtual machine, our Hyper-V data recovery experts can help.
What Is Hyper-V?
Hyper-V is Microsoft’s Enterprise-class virtualization hypervisor. A hypervisor is the software that allows you to create virtual hard drives and virtual machines. Hyper-V is a Type I “bare metal” hypervisor, meaning that the hypervisor itself is the next step up from the hardware.
In general, the hypervisor is the mediator between “host” machine and “guest” machine. The host machine is the actual physical device itself. The guest machine (or machines) is the virtual environment created by the hypervisor. A Type I hypervisor like Hyper-V (can you guess where the name comes from?) manages the server’s hardware the same way the operating system itself would.
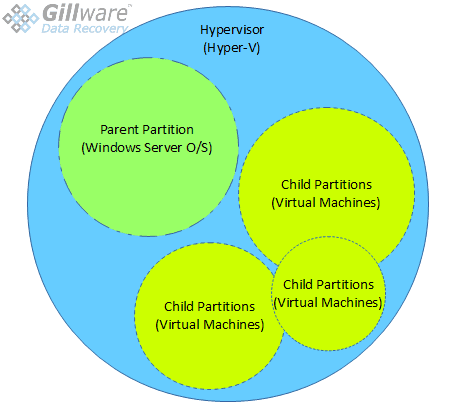
Type II embedded hypervisors, such as VMWare Workstation or VirtualBox, run inside an O/S just like a normal program. Hyper-V differs from an embedded hypervisor in that it occupies the spot in the “chain of command” where the host machine’s operating system would usually sit. Somewhat counter-intuitively, the operating system (Windows Server 2008, 2012, or 2016) is installed first. The Hyper-V kernel then inserts itself in betweenthe O/S and the hardware. This gives Hyper-V the control over the hardware that the Windows Server O/S usually has. Hyper-V creates a “parent partition” to contain the Windows Server O/S. Hyper-V can then create further “child partitions” to contain each virtual guest machine. The operating systems in the child partitions do not have any direct access to the server’s hardware. Instead, Hyper-V manages that on their behalf.
Talk to Hyper-V Data Recovery Expert Today!

Our client advisors are available by phone during business hours
(M – F: 8am – 7pm; Sat: 10am – 3pm).

Send us an email including the type of device you have and the problem you are experiencing. A client advisor will respond within 25 minutes during business hours
(M – F: 8am – 7pm; Sat: 10am – 3pm).

Have a quick question about the data recovery process? Use our chat feature to chat with one of our client advisors (not a robot!) during business hours
(M – F: 8am – 7pm; Sat: 10am – 3pm).

Want to schedule a call for a time that is convenient for you? Click the button above to schedule a brief consultation with one of our client advisors.
Click here to schedule a call
Recovering Hyper-V VMs After a Server Crash
Hyper-V data recovery from a crashed server or SAN can be a difficult and intensive procedure. Essentially, there are two data recovery cases going on in every virtual environment recovery scenario. First is the recovery of the files from the physical media. Second is the recovery of the files from the virtual media.
If the server or SAN containing your Hyper-V virtual environments crashes, Gillware can help. In these situations, we commonly see the virtual machines stored on RAID-5, RAID-6, or nested RAID arrays. While these arrays are fault-tolerant, they are not failure-proof. A failure of multiple hard drives can occur for a variety of reasons. Our engineers will repair the failed hard drives in your server or SAN and reconstruct the array as best they can. Heavy damage to the drives can lead to “gaps” in the array. These gaps can affect the integrity of your Hyper-V virtual machines.

Our Hyper-V data recovery technicians clone the recovered virtual environments onto physical hard drives for thorough analysis. Through clever use of status mapping, our technicians can cross-reference the failures on your server with the data on your virtual machines. Cross-referencing the status maps helps our engineers make sure we are obtaining the best Hyper-V data recovery results possible.
How We Recover Deleted Hyper-V Files
One of the benefits of Hyper-V is that it is difficult to accidentally delete the virtual hard disk itself. Using Hyper-V Manager to remove a virtual workstation only deletes the checkpoints and configuration files and removes the virtual machine from its manager. The actual virtual hard disk file remains untouched, and you would have to go out of your way to delete it. That said, how many times have you intentionally deleted a file only to realize after the fact that you still needed something inside it?
No matter how much stuff is inside a virtual machine, behind the magic your hypervisor makes to make it look like a real computer, it’s still just a really big single file. Your host machine’s filesystem determines where a file goes when it’s deleted. Windows Server 2008 uses NTFS, while Server 2012 and 2016 can both use NTFS and Microsoft’s new ReFS filesystem. In these filesystems, a deleted file doesn’t automatically disappear. Instead, the filesystem removes the flags that mark the clusters containing the file as “in use”.

This becomes a big problem if your server remains in use afterward. Every new bit of data written to your server has a chance of overwriting part of the virtual machine. And that chance climbs higher and higher the more new data gets written. This can corrupt the critical files inside your Hyper-V virtual machine. After recovering your deleted VM, our technicians look through it and judge how much data, if any, has been corrupted.
We can also recover deleted data from within a healthy Hyper-V virtual machine. Our technicians take the healthy virtual machine and clone it to one of our own hard drives. We can then perform a normal deleted file recovery operation on the now-physical disk. Our technicians can also recover data that has been lost after an accidental checkpoint revert operation.
Looking for a different type of data recovery?

If you would like to contact us to receive a no-pressure consultation, click the button below. This will take you to a page with our phone number and email. This page also provides you with the option to schedule an appointment with a Client Advisor at a later time or date, or chat with them online.
Click the button below if you would like to send in your device. Sending in your device is financially risk-free. You will be asked to fill out a short form. Once you have completed the form, we will send a shipping label to the address provided. After we receive your device, we will begin a free evaluation and contact you with a firm price quote.
